
- We're here to help!
- 780-940-6767
- michael@nordalta.com

Creating a wheelchair accessible bathroom.
Why is it important to develop a budget for your renovation project?
December 11, 2025Should your contractor use subtrades or should they do everything themselves?
January 8, 2026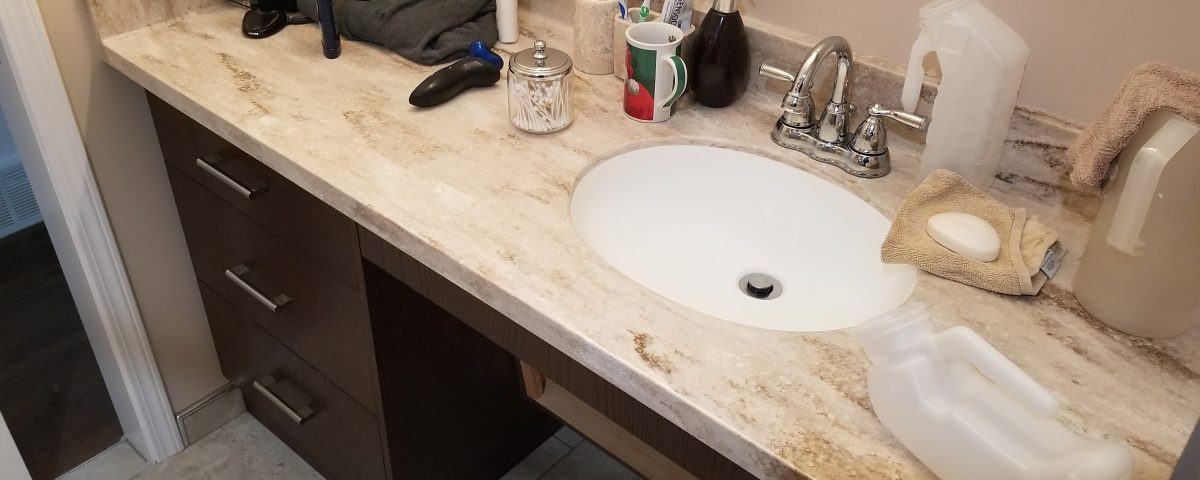
As 2018 winds down, I had the opportunity to go back and look at some of the projects we completed this year. It was very easy to see, looking at the project photos we took, that a growing segment of our business is renovating for accessibility…especially in bathrooms. I thought it might be interesting to have a look at one of the projects we’ve done and go through some of the things we did to turn a run-of-the-mill bathroom into an accessible one.
This bathroom was actually completed the year prior but I am choosing to focus on it for two reasons: The first is that the bathroom is wheelchair accessible and the second reason is that I was able to revisit this bathroom in 2018, simply because we were back there to renovate the client’s kitchen. So without further ado, here is a look at the completed project.
The shower area.
One of the challenges with a wheelchair accessible bathroom, aside from space limitations that generally exist with the average bathroom, is creating a shower space that has no barrier. The trick requires the shower area floor to be at the same level as the bathroom floor and gradually slope to the drain. Here we were able to achieve this by building up the bathroom floor slightly and cutting out a small section of the sub-floor around the drain and block in that area between the joists. This gave us the required 1/4 inch per foot slope for the floor drain.
The shower floor is then sloped with a drypack mortar bed and the entire shower floor and walls are waterproofed with a membrane - in this case we used the Schluter Kerdi product with integrated floor drain. The rest of the bathroom floor is covered with an uncoupling membrane and then everything was tiled.
Prior to this, of course, we installed the adequate backing for mounting the bench and grab bars. The grab bars and bench are stainless steel, meaning they won’t rust when exposed to moisture (very handy in the shower area). and finally, we installed a curved shower rod for a little bit of privacy.
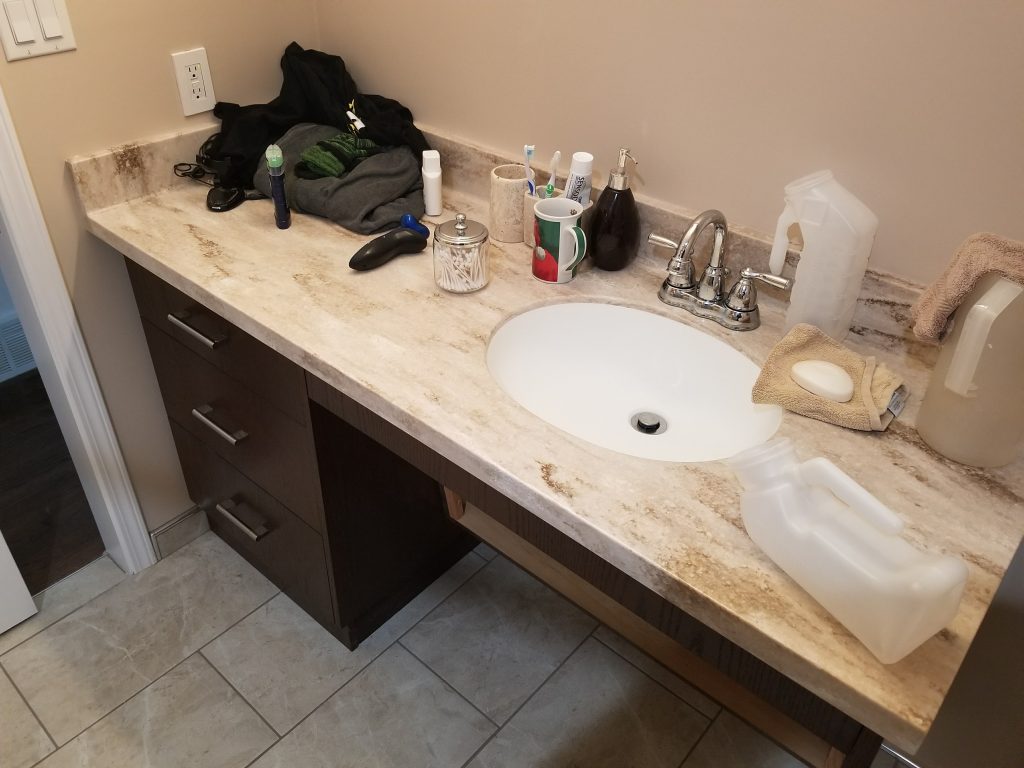
The vanity.
The vanity that we put in for this project has an important feature in addition to being accessible by wheelchair. Normally, a lot of vanities will be open underneath the sink with the drain exposed below. A concern that the client had was bumping into the drain. Without 100% feeling in his legs, he felt he might damage the drain by running into it or worse, hurting himself. Not only does the angled panel below the sink prevent this, but it also gives the vanity a more finished look. The counter top is Corian with an integrated sink and a set of lever taps that are easier to turn on and off.
The door.
Amazingly, the old door used to be a swing door, and although I can’t recall the width, I do remember that it was barely big enough to get the client’s motorized wheelchair through it. The jamb and casing were battle-scarred and it was a struggle to get in and out of the bathroom. We removed the old door and frame, as well as a good portion of drywall in the hallway, and we re-framed the doorway to accommodate a pocket door. The new door is 36 inches wide, which is more than enough to get the wheelchair into the bathroom easily. There is a slight transition from the hardwood to the tile in the bathroom floor, but not enough to cause any difficulties.
Final thoughts.
Not every bathroom is a candidate for wheelchair accessible treatment. We were fortunate that this one was. With some good planning and proper materials, we were able to provide a good option for our client to continue to live at home and become more independent.